You checked the address character by character and added it to your whitelist, then went back to the withdrawal page, and the address still can't be used. Or you get a message saying withdrawals are temporarily unavailable. Most people's first thought is that they skipped a step somewhere. They didn't.
Binance's withdrawal settings contain two switches with very similar names, and odds are you only touched the first one. The Withdrawal Whitelist decides which addresses your coins can be withdrawn to; the Whitelist Withdrawal Limit decides how long a newly added address has to cool off before it can be used. The one actually blocking you is usually the second.
The interface paths and rules in this guide were checked in 2026-09 against Binance's official help page on managing the withdrawal settings of a Binance account, read in its Chinese-language version (the page shows a last-updated date of 3 March 2025). Apart from the labels visible in the English settings panel in the screenshot below, button and field names here are translated from that Chinese page and may be worded differently in your interface. What your own account shows is what counts.
Three Switches on One Screen: Know Which One Does What
All three sit on the same Withdrawal screen in your settings, stacked one above the other, and the first two both have "whitelist" in the name, so they are very easy to read as one thing. Their jobs are actually quite distinct:
| Switch | What it controls | What happens once it's on |
|---|---|---|
| Withdrawal Whitelist | Which addresses coins can be withdrawn to | Withdrawals only go to addresses on the whitelist |
| Whitelist Withdrawal Limit | When a newly added address can be used | For the length of time you set, withdrawals to newly added whitelist addresses are blocked |
| One-step Withdrawal | Whether a withdrawal asks for 2FA | Small withdrawals to whitelisted addresses can skip 2FA, up to a limit you set |
In the waybill terms this site likes to use: the whitelist is a list of recipients cleared for delivery, the limit is an observation period every new recipient has to sit through, and One-step Withdrawal is "small parcels for regulars, no signature needed". None of the three stands in for another, and which you switch on or off changes the outcome completely.
So the next time you get stuck, don't rush to re-add the address. Go back to that screen and check, row by row, whether each one is On or Off. The problem is almost always there, not in the address you just copied.
What Your Account Looks Like With the Withdrawal Whitelist On
In one sentence: from then on you can only withdraw to addresses on the list, and every other address is refused. The official page states plainly that withdrawals are supported only to addresses on the whitelist. It doesn't add a reminder or an extra verification step; it simply won't let the withdrawal through.
Turning it on is quick: after logging in, hover over your profile picture, open settings, scroll down to Withdrawal, click Enable next to Withdrawal Whitelist, then verify once with a passkey or two-factor authentication (2FA). Turning it off follows the same path: click Disable, read the warning in the pop-up, confirm, and verify once again.
Whether it's worth turning on depends on what you're afraid of. On-chain transfers have no undo button; once it's signed, it's gone. This site has covered the two most common ways people lose coins. One is address poisoning and clipboard hijacking, where what you copied was right but what got pasted belongs to someone else. The other is plainer: the coins simply went to the wrong address, and the chances of getting them back are slim. That's where a whitelist earns its place: it turns "check the address on every single transfer", something you do constantly, into "check it carefully once, when it goes on the list". After that, every withdrawal is a pick from the list, the paste step is bypassed, and no amount of clipboard swapping by malware makes any difference.
It also blocks a nastier scenario: someone getting into your account. With a whitelist in place, even an intruder who has your login can only withdraw to addresses you approved yourself, so the most direct way of cashing out through withdrawals is shut. But don't read that as "untouched even if you're hacked": the intruder may still try to add a new address to the list (stopping that is the job of the Whitelist Withdrawal Limit, covered below), or stay in the account and trade your assets away. A whitelist shrinks what you can lose; it doesn't remove the risk.
One figure while we're here: the Binance help page gives a limit of up to 200 withdrawal addresses. For an individual user that's hard to run out of, so there's no need to hold back on adding addresses to save room.
Adding an Address, Start to Finish
The way in is Address Management under Withdrawal in your settings. Hover over the add button and the menu offers two options, adding a single address or adding addresses in bulk; to add one at a time, pick the first. Below that are a few fields, and each one deserves some care:
- Address label. Give the address a name you'll still recognise three months from now. "OKX spot USDT" or "cold wallet main" both work; names like "address 1" or "test" will leave even you unable to tell which is which. Once the list gets long, picking the wrong row becomes more likely than mistyping a character.
- Pick a coin, or make it a universal address. You can make the address valid for one coin only, or set it as a universal address. When you pick a specific coin, watch out: if you choose BNB, for example, you also have to choose the matching network. The network step is the same trap as in any normal withdrawal; if it's unfamiliar, read your first withdrawal, start to finish first.
- Address source (optional). There are three options: an exchange address, a wallet address, or other. Whether you fill it in doesn't affect whether the address works, but it's there for you: half a year later, scrolling back through the list, knowing which exchange an address sends to saves a lot of trouble.
- Tick the box to add the address to your whitelist. This is the step people miss most. Address management and the whitelist are two separate layers: the address gets saved, but without that box ticked it's just an address-book entry, not on the whitelist, and an account with the whitelist switched on still can't withdraw to it.
- Save, then pass 2FA. As with any other security change, you verify your identity once.
Clear out addresses you no longer use while you're at it: click the "..." next to the address, choose to remove it from the whitelist, then confirm the removal. The cleaner the list, the lower the odds of picking the wrong one.
Before an address goes in, it still needs checking. An address on the list is checked once and reused for a long time, which is exactly why this one check deserves real care: besides the first and last characters, pick a stretch in the middle and compare it too, and compare against the copy the recipient gives you there and then, not one dug out of an old chat. We've put this step into the transfer checklist; running through it item by item when you add a whitelist address beats chasing responsibility after the fact.
What's Really Holding You Up Is the Next Row Down
The Whitelist Withdrawal Limit is a separate switch. Binance describes it like this: once it's on, newly added whitelist addresses are blocked from withdrawals for the length of time you configured. Note the scope of that sentence: only the newly added addresses are restricted. Older addresses already on the list are unaffected and withdraw as usual.
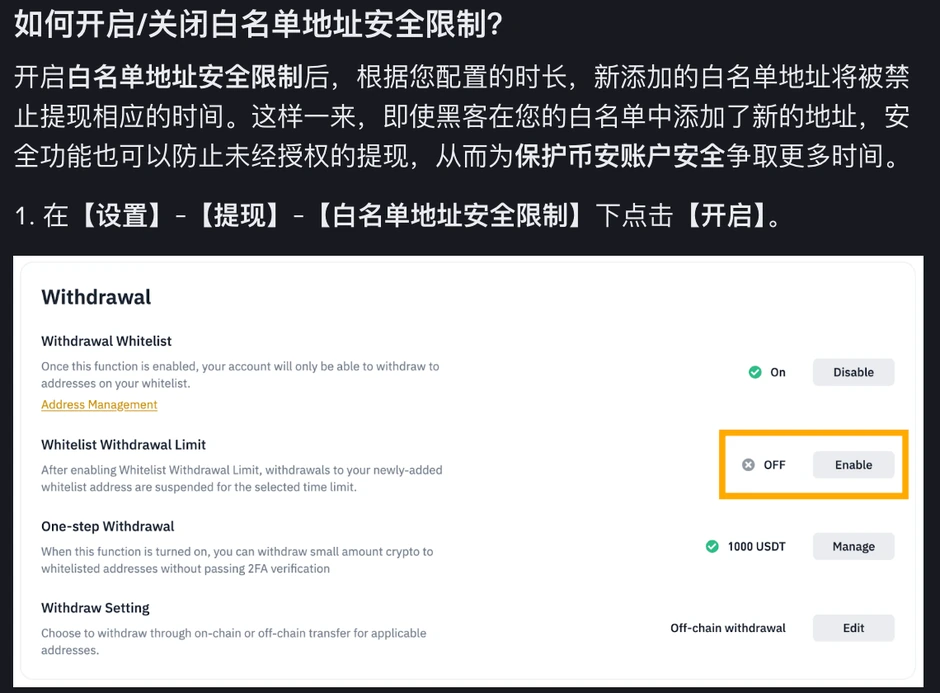
Binance is quite direct about why it works this way: even if someone breaks into your account and slips an address of their own onto the whitelist, this limit keeps that withdrawal out, buying you time to notice something is wrong and take the account back. In other words, the wait isn't the system making life hard for you; it's hitting the brakes on behalf of a you who hasn't noticed yet.
The path is settings, then Withdrawal, then Whitelist Withdrawal Limit: click Enable, choose a time period, then confirm. What happens if you turn it off is spelled out just as clearly: once it's off, every whitelisted address, including ones you've just added, can be withdrawn to immediately. Binance's own recommendation is to keep it on.
So when you've added an address and can't withdraw to it, go in this order: first check whether this row is On; if it is, check how long a period you chose back then, and work out whether that time has passed. You set the period yourself and can see it on the page, so there's no need to guess.
The Second Kind of Block: Touching the Whitelist at All
The case above stops one address. There's another that catches people even more off guard: it stops withdrawals altogether.
Binance flags this in two places. One is in the instructions for adding a whitelist address: after you change the Withdrawal Whitelist, the withdrawal function may be temporarily disabled for a period (24, 48 or 72 hours). The other is in the instructions for turning the whitelist off, and the wording there is firmer: once it's off you can withdraw to any address, but if you previously turned on the Whitelist Withdrawal Limit, the withdrawal function will be temporarily disabled for a period (24, 48 or 72 hours).
Those three numbers are the options Binance lists. The page doesn't say which situation gets which, and I won't guess on its behalf: go by the prompt your own account shows. One thing is certain: changing the whitelist has a cost, and the cost is counted in hours.
That leads to a very practical rule: set up your whitelist when you don't need the money in a hurry. Add your regular addresses a few days early and let the limit period run out, so that on the day you actually need to withdraw, it goes through in one go. The reverse, remembering at the last minute and thinking "if I just switch the whitelist off, the withdrawal should work", backfires: switching it off can itself leave you waiting one to three days, which is slower than leaving it alone.
Draw a clear line here between this and another kind of stop. A changed password, a new 2FA, logging in on a new device, a large amount triggering manual review: those are withdrawal suspensions from risk controls, and their causes and conditions for lifting belong to that system. What this guide covers is the wait built into the whitelist mechanism itself: it follows from your settings, you chose the period, and its status is visible on the withdrawal settings page. The two show different messages, so don't mistake a whitelist wait for a problem with your account, and don't go looking in the whitelist for the answer to a risk-control suspension.
What One-step Withdrawal Saves You, and What It Doesn't
The same screen also has One-step Withdrawal, which is often mistaken for a faster version of the whitelist. It really only does one thing: small withdrawals to whitelisted addresses can skip 2FA. What counts as "small" per withdrawal is a verification-free amount you set yourself.
What it saves is the few seconds of reaching for your phone and typing a six-digit code each time. What it doesn't save is the wait: every whitelist rule still applies, the limit still governs new addresses, and changing the list can still trigger a suspension. It sits on a different layer altogether.
One more detail worth noting: Binance's description of this feature includes the line that, with it turned on, you may still need to complete two-factor authentication. So skipping verification isn't guaranteed; if the system decides a withdrawal needs checking, it will still stop and ask. Think of it as "a few fewer taps most of the time", not "never verify again".
Whether to turn it on comes down to whether you mind the hassle more or losing coins more. If you make frequent small withdrawals to your own wallet, it genuinely helps. If you use more than one device, or your phone is often not on you, those few seconds of convenience cost you a lock, and that's a bad trade.
So Should You Turn It On? It Depends Who You Are
There's no single answer, but that's no excuse for fence-sitting. Find yourself below:
- Your coins mostly sit on the exchange, and your withdrawals go to the same two or three addresses (your own wallet, another exchange). Turn it on, and turn the limit on with it. Your addresses don't change anyway, so the whitelist will hardly ever get in your way, while it shuts the most direct cash-out route an account thief has. Nobody gets more value out of a whitelist than you.
- You often withdraw to different new addresses (paying others, over-the-counter deals, sending coins to different people). The whitelist will block you every day: each new address has to be added first and then sit out the limit period. You can leave it off, but then you have to make up for that line of defence yourself: check addresses section by section, send a small test before a large amount, and keep your devices clean. Your protection can't just lose a layer for nothing.
- You're just starting out, with a small balance. This is the best time to set it up. Configure the whitelist, the limit and 2FA in one go while the balance is small, and by the time the numbers in your account grow, you won't have to touch these switches just when you need your money. What touching them costs has already been covered above.
- You have money you need to withdraw urgently. Change nothing today. Withdraw it with the settings as they are, then come back and set things up at your own pace. If you remember one line from this guide, make it this one.
A final word on scope: the paths and wording above come from Binance. Most major exchanges have a similar mechanism, with different names and different waiting periods, and some build the new-address cooling-off period straight into the whitelist without giving it a separate switch. Don't carry this guide's button names over to another exchange; go by the prompts on the one you actually use.
A whitelist feels like a nuisance while you're setting it up. On the day something goes wrong, it's the one door still standing.
Frequently Asked Questions
The address is already on my whitelist. Why can't I withdraw to it?
First check whether the Whitelist Withdrawal Limit is on. Once it is, newly added whitelist addresses are blocked from withdrawals for the length of time you set, while older addresses can be withdrawn to as normal during that period. On top of that, changing the whitelist can itself temporarily disable withdrawals for a period (24, 48 or 72 hours).
Do I have to turn on the Withdrawal Whitelist?
No, it's optional. Once it's on, withdrawals are supported only to addresses on the whitelist: even if your account is stolen, coins can't be withdrawn to an unfamiliar address. The cost is that every new receiving address has to be added to the list first and then wait out the limit period.
How many addresses can a whitelist hold?
The Binance help page says up to 200 withdrawal addresses. Each address can be valid for a single coin only or set as a universal address; if you pick a specific coin, make sure you pick the right network.
If I turn off the Withdrawal Whitelist, can I withdraw to any address right away?
Once it's off you can withdraw to any address, but Binance notes that if you previously turned on the Whitelist Withdrawal Limit, withdrawals will be temporarily disabled for a period (24, 48 or 72 hours). Switching it off to get out of a tight spot will most likely not be fast enough.